


|

|

|

|

|

|
Printing With Color Profiles in Photoshop
Related: Apple macOS, color space and gamut, How-To, Photoshop, printing
Last Updated: 10 May 2005, Version: 1.01
This article steps the reader through the process of printing using color profiles in Adobe Photoshop CS/CS2. Step-by-step screen shots are provided at every step. Each screen shot is annotated, and text explains why each step is needed. The screen shots are all from Mac OS X, but Photoshop dialogs on other platforms are very similar, and the concepts do not change. If you don't use Adobe Photoshop, the concepts will be the same in other programs, so reading the article should still be helpful. The screen shots from the Epson printer driver are significantly different from Mac OS X to Windows; this article will be updated in the future to add the Windows screen captures.
This article is for you if you:
- want to get accurate color in your prints.
- don't understand how or why color profiles are used.
- are not sure how to print your files to get accurate color from your printer.
- need a handy reference on a step-by-step printing procedure.
It covers the following topics related to these goals:
- An introduction to color spaces and profiles.
- An introduction to calibrating and profiling your computer monitor.
- Setting up Photoshop color preferences.
- Color space of your image, and why it's important to have one.
- Step-by-step printing instructions
The step-by-step instructions include:
- making a duplicate
- Page Setup
- Image Size and resolution
- Simple sharpening
- Print with Preview dialog and its Color Management options
- Print dialog and setting the printer settings
1. Background
This article explains how to print with accurate color to an Epson Stylus Pro 7600, Styles Photo 1280, or any similar printer using Adobe Photoshop CS/CS2. If you don't use Photoshop, the same principles apply, assuming your program allows you to manage color properly. Even if you don't print very much, the concepts in this article should still be useful in other areas.
While reading this article, it is helpful to understand what a color space and color profile are. See Appendix A--Gamut, color spaces and profiles. However, may safely skip that section and simply follow the step-by-step instructions in this article.
Not all printers are suitable for printing a quality color photograph. Those designed for business graphics for example, will not produce accurate color, as they may use only 3 or 4 ink colors—not enough for accurate color.
For a long time, Epson has been the photographer’s choice for high-quality photographic printing. Its "Stylus Photo" line (emphasis on Photo) has appealed to serious amateurs, and its Stylus Pro line has targeted professional photographers. However, Canon and Hewlett Packard are now competing with Epson in these markets. In general, a printer suitable for high-quality photographic prints should have at least six different inks. The additional inks allow a wider color range and more accurate color within that range. Ideally, the inks should be in separate cartridges so that running out of one color does not mean discarding the whole cartridge. But that is an issue of cost, not quality.
A printer that ships without high quality printing profiles is next to useless for printing color photographs. If it has a suitable ink set and printing head setup, it may be amenable to getting a custom profile made for it. However, any manufacturer that does not provide printing profiles for its printer should be avoided.
The author’s experience is with Epson printers over a number of years. While Canon and HP no doubt now offer some excellent and appropriate printers, the author cannot confirm or deny this from personal experience.
The Epson Stylus Photo series printers come with a set of color profiles for the printer. These profiles are quite good, especially the ones for the wide-format printers (9600, 7600, 4000 series). If you are using an Epson 9600 or 7600, profiles are available on the Epson site which were created to exacting quality by color expert Bill Atkinson. These are the best printer profiles I've used, and a compelling reason to buy one of these printers if you're looking for accurate color—you won't find a better profile. You may also choose to have your own custom profiles made, which is a necessity if you are using a paper for which Epson doesn't supply a profile.
Read section 2 to learn how to set up your color preferences and to verify that your image has a color space assigned to it. Read section 3 for a step-by-step outline of how to print your image. In most cases, screen captures are shown. Where there there are significant differences between Photoshop CS and Photoshop CS2, both screen captures are shown, with the Photoshop CS version to the left or above the CS2 version. All screen captures are from the Mac OS X version of Photoshop CS and CS2.
High capacity, high-performance fault-tolerant storage for photography and video.
Non-RAID or RAID-0/1/4/5/10.
Capacities up to 72 Terabytes!
2. Setting up Photoshop color preferences
Before you begin, prepare your Photoshop color preferences as detailed below. There are many possible configurations, but if you are unsure, start with these settings.
2.1 Verify that Photoshop Color Settings are correct
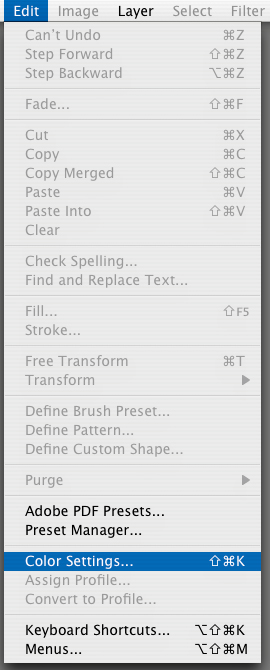
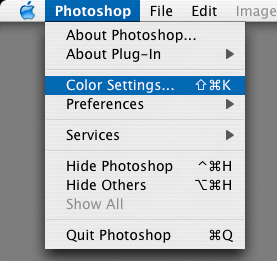
Choose Color Settings...:
| Photoshop CS | Photoshop CS2 |
|
 |
The following dialog appears. In Photoshop CS2, you may have to click the More Options button to see all the choices (not shown below. Configure the settings as shown:
Photoshop CS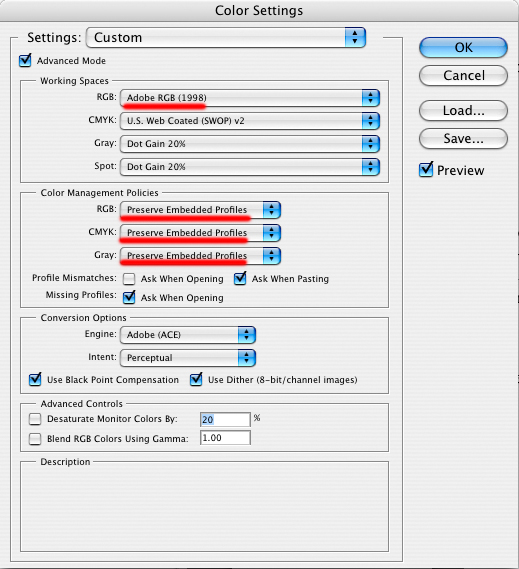 |
2.2 Verify the color space of your original image
Prior to printing your image, you should verify that it has a color space assigned to it. Open your image in Photoshop. If it has an embedded color space saved within the file, Photoshop will automatically display it appropriately. But if it has no color space, Photoshop will ask you when you open it (assuming you checked (enabled) the Missing Profiles: Ask When Opening setting as shown in the Color Settings dialog). The Missing Profile dialog will appear:
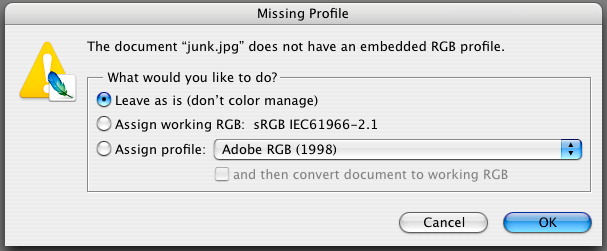
If you click Cancel, or this dialog did not appear, you can still assign a profile later. If you know the document's profile, select Assign Profile and choose the appropriate profile (Adobe RGB is shown above). If you're not sure, you may want to defer making a choice; you could make several duplicates of the document once it is open, and assign sRGB to one and AdobeRGB to another to figure out which color space works best for the image. Most of the time, the correct profile will be one of those.
Note that having to assign a color profile should be a rare event—you should be saving all your images with embedded profiles so that this error-prone step may be avoided entirely. Images saved for the web should usually be in the sRGB color space.
If there is no color space ("untagged RGB"), then you'll need to make a best guess as to the correct one. Check the lower left corner of the image window to see (you may have to choose Images). In this case the image is in the sRGB IEC61966-2.1 color space. The name is not important; the fact there there is a profile is important.
... Regrettably, this article was damaged (truncated) ....