


|

|

$200 Leica BP-SCL6 Lithium-Ion Battery (8.4V, 2200mAh) BACK IN STOCK in Accessories: Batteries and Power
|

|

|

|
Nikon Capture NX—The Good, The Bad, and The Ugly
Related: exposure, How-To, infrared, memory, Photoshop, usability
Contents
Quick fix: shadow and highlight protection
Overall thoughts on Capture NX2
Simple things should be simple
Introduction
The staff at photographyreview.com were unable to cover a late May 2008 Nikon event in San Francisco, and asked me to attend in their stead. The nature of the announcement was unspecified, but I jumped at the chance to meet some new Nikon folks at Dog Patch Studios in San Francisco.
It turned out that the announcement was for Nikon Capture NX version 2, which delivers several promising new features over Capture NX 1.x. Capture NX 2 is a distinct step forward from 1.x, and capable of producing outstanding images from the Nikon D3. A 60-day trial version is available. Perhaps one day Nikon will come around to the idea that Capture NX is strategic and make it free to all Nikon DSLR users, or just free to all-comers—what better way to get mass adoption?
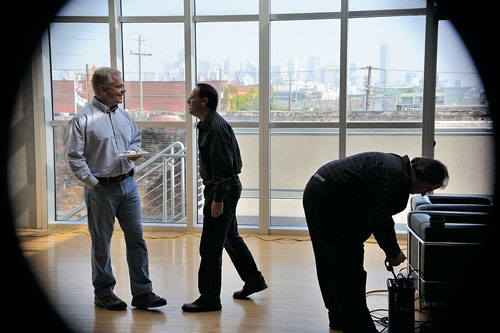
Friendly banter is always fun before the real work begins, shown below are Rob Galbraith of robgalbraith.com enjoying a friendly back-and-forth with Lindsay Silverman of Nikon while Tony Corbell of Nik Software sets up the strobes for the shoot.
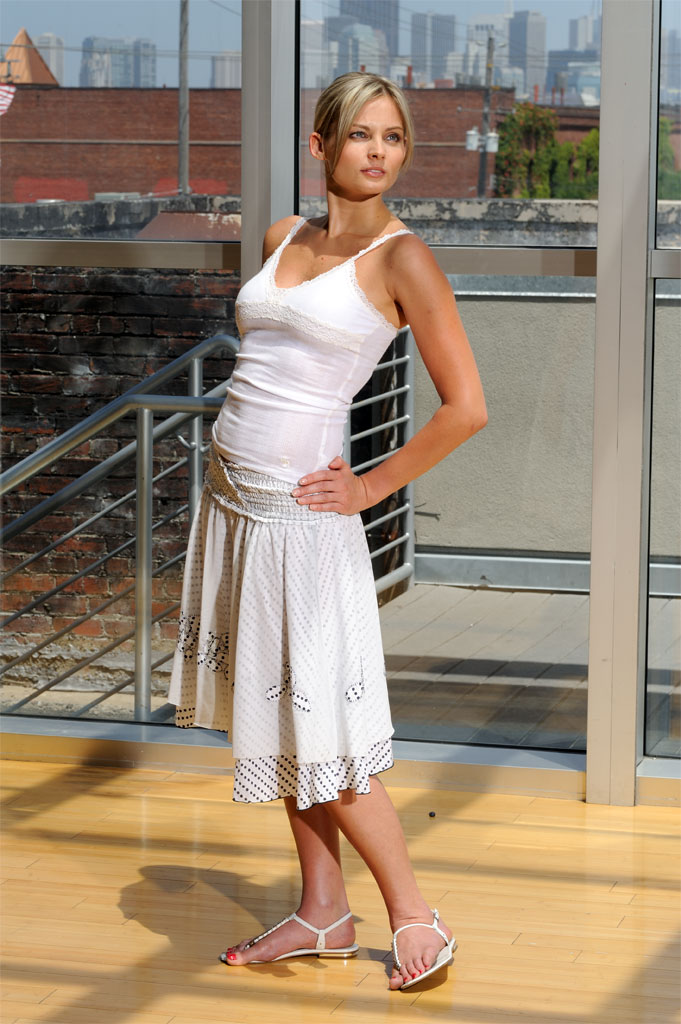
When shooting began, I was reminded once again why ISO 50 or 25 or even ISO 6 (!) would be a big plus on a digital camera: with the powerful strobes set to minimum output, aperture f/16 was required to not blow out highlights at ISO 100. This limitation isn’t confined to strobes; just try shooting at f/1.4 mid-day sunlight (if you’re a little crazy as I am).
Works on any file — Good
One big misunderstanding I had carried until recently was not understanding that most of the features of Capture NX can be used on any image file, not just RAW files. This means you can process (for example) a Canon EOS 1Ds Mark III CR2 file into a TIF or JPEG, then use the features of Capture NX 2 to make non-destructive edits to the TIF file, saving it as a NEF. It can then be exported as a (new) TIF file for further work in Photoshop.
In spite of the “any file” advantage, keeping workflow simple is a huge plus, so anyone shooting something besides Nikon DSLR RAW might not want the extra complication of Capture NX in the middle of the workflow process. One can learn only so many programs. Still, some of the features are compelling.
New features in Capture NX 2
Discussed below are key features of Capture NX 2, ones that make the program worth looking at for both new users and existing Capture NX 2 users.
Selection Control Points — Good
Capture NX 2 now allows the ability to use a wide range of functionality via its new “selection control points”. Capture NX 1.x offered a much more restricted functionality. This extension makes the effort of learning the control point approach a more worthwhile time investment, because control points can now be applied against many different image processing options.
EXAMPLE
Here we want to draw attention towards the model’s face, which is a bit too dark. Mouse over the image to see the before/after effect. The control point has allowed a localized and seamless enhancement without the complexity or hassles of using layers and masks.

Settings for the enhancement above: the control point was centered on the model’s face, and the D-Lighting feature was used to lighten the shadow areas of her face. Color boost was left at the suggested default.

Auto retouch brush — Good
The Auto Retouch brush is a great new feature in Capture NX 2—great because the original is not altered (whether it be a RAW file or a JPEG/TIF). If you’ve ever “spotted” an image in Photoshop, you know this often means making another layer so as to preserve the original—a waste of storage, not to mention making mistakes is no fun when it’s noticed 10 steps later.
Capture NX offers its “Auto Retouch Brush”, which records any retouching/spotting as steps in the image processing, so no original data is ever altered. Choose the Auto Retouch Brush from the palette, set an appropriate brush size, and click away. It’s that simple.

Capture NX 2: choose an appropriate size brush
Example
Someone dropped a blueberry on the floor. The background has some distracting crud. The sensor has dust spots. And it’s important that our model’s skin has no blemishes. Mouse over/out of the image to see the difference. (Click for a larger version).
Now that this feature is in Capture NX 2, will other vendors follow suit? We hope so, because it makes tons of sense—spotting is really a step that belongs in the first stages of image conversion, and it can be done much more efficiently and conveniently when recorded as individual actions (which can also be turned off). Compare that to the permanent edits one makes when using Photoshop; the workaround is a duplicate layer, which immediately doubles the file size.
The downside to the Capture NX 2 Auto Retouch brush is that it offers less flexibility (compared to Photoshop) in terms of brush size, source vs destination, etc. But for retouching numerous smaller blemishes, it works great. A full-blown image editor can always be used as a follow-on step, if the work required is extensive.
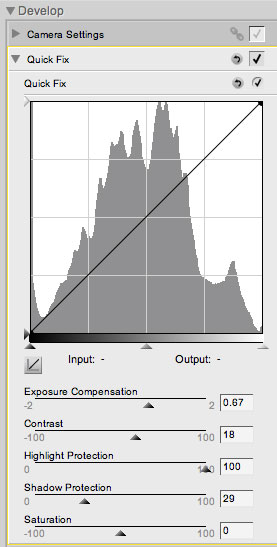
Quick fix: shadow and highlight protection — Good
Any feature that takes minimal effort and yields good results gets my vote. The Capture NX2 “Quick Fix” dialog offers that winning combination of ease of use and pleasing results—much easier than learning the equivalent layers/curves/levels approach in Photoshop.
The confusingly-named Shadow “Protection” really seems to mean “lighten dark areas”, whereas “Highlight Protection” prevents highlights from being blown. Used together, along with exposure compensation and contrast, powerfully simple effects can be achieved.
EXAMPLE
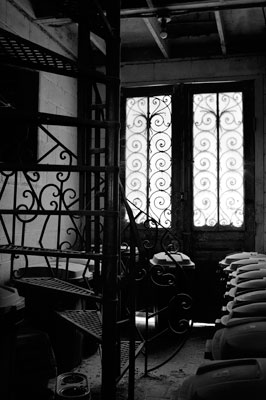
Let’s take a look at an image which at first glance looks fairly difficult, because at least for this author, salvaging it in Photoshop would simply not be worth the effort. A simple exposure compensation will blow the highlights, a curve might require masking for the desired effect, etc.

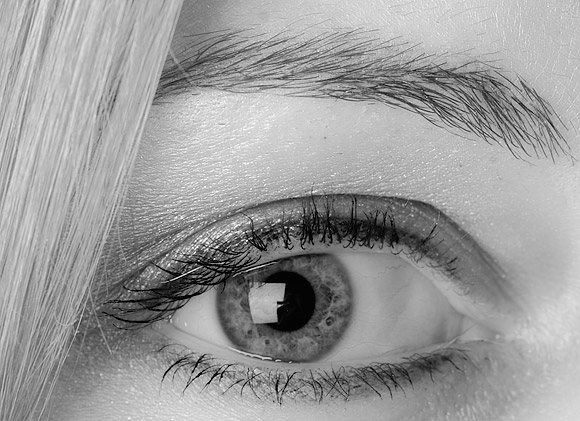
Exposure compensation by itself “blows” the highlight detail over a large area of the hair. But by combining with we can have the best of all worlds: shadow areas opened up, highlights preserved (at the cost of being a bit “flat”), etc.
The Quick Fix - Shadow Protection feature isn’t just for beautiful models; it works great on any sort of difficult image. Click on the image below for a previous blog entry.
Effects can be over-used, and some care needs to be taken to avoid unnatural-looking images. Below is another example showing how very different an image can look from the “as-shot” original. In this case, the adjusted image looks unnatural; this is a tough image to work with. Probably this image is best dealt with using control points to lighten specific areas, such as the model’s face, or, alternately, the layer/mask approach in Photoshop. (Better yet, re-shoot with fill flash, but this image was made intentionally, knowing there would be a problem!).

Other features new or improved in Capture NX 2
Included in Capture NX 2 are not just are a number of usability improvements including:
• Workspaces — NX 1.x was awful with more than one monitor; NX 2 not only seems to understand multiple monitors but allows the creation of user workspaces, in addition to four “canned” workspaces that exist by default: Browser, Metadata, Multi-purpose and Edit. The user can swap between these workspaces quickly.
• Palette layout — the settings are now directly visible in NX2, making it much easier to see overall options for multiple adjustment palettes.
• Improved file browser. Much improved over version 1.x, the browser is now a usable tool in NX2, though its behavior is not entirely consistent with Nikon View, which can be confusing at times (check which program you’re using!).
• Improved speed: this is a subjective assessment, speed does seem faster than with Capture NX 1.x on Mac OS X.
The Bad and the truly Ugly — usability
Capture NX 2 is capable of outstanding image quality. Use it where it is at its best: processing a single file.
Where NX 2 falls flat is with overall usability, and it is downright painful working with batches of files where each file needs some tweaks of its own. This author is hard pressed to think of a worse user interface design in a RAW-file converter. The user interface design seems to be a literal translation of some engineer’s stream of consciousness thinking about the code and data structures, as opposed to thinking about how to ease the workload on the user. The NX engineering team should study Apple’s Aperture, or Adobe’s Lightroom for example. This author, having been a software engineer for 20 years, would lay odds that the NX team has never consulted a skilled user interface designer.
There are so many problems with the NX2 interface that this section can only scratch the surface. Many days could be spent documenting its awkward, time-wasting “design”. It feels more like glorified shareware program than a professional software program.
The foregoing is not just a theoretical rant; the author has tried valiantly to use Capture NX to process several different “shoots” consisting of 30 - 60 images. What takes 20-30 minutes in a program like Canon’s Digital Photo Professional takes 3-4 hours in Capture NX. For shoots involving hundreds of images using it would simply be impossible.
Simple things should be simple
This fundamental principle has been respected at a micro level with features like , and others: those features are fairly intuitive in their operation. But move up the conceptual level to putting a full workflow together, and NX2 quickly becomes a frustrating experience, offering up “you lose” barriers at every juncture. Productivity plummets with NX2 when working with more than one or two images. Even the much-maligned Canon Digital Photo Professional looks good by comparison; I estimate a 10 to 1 reduction in productivity based on personal experience (when sorting/analyzing/tweaking with a fresh shoot of 20-100 images).
Headaches in NX
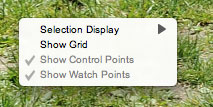
The NX2 user interface is unwieldy and frustrating; visually it’s hard to navigate as well, providing poor visual cues, very limited context-sensitive (popup menu) functionality and a rigid arrangement of Pangea palettes that behave in awkward ways. Things that should work intuitively are confusing or model or available in a surprising place.
Unstable, awkward interface
A fundamental principle of user interface design says that behavior should be predictable; UI elements should not arbitrarily appear and disappear, shift location, etc. For example, it is well accepted that menu commands that are currently inapplicable do not disappear entirely; they remain but are grayed-out to show that they can be applied to something. The alternative of removing all inapplicable commands would constantly change the structure of the menu making it “unstable”. Fortunately, NX2 respects that convention, but with respect to its palettes it does not; they enclose arbitrarily when doing certain operations, and must be manually reopened.
In NX2, user interface elements have a mule-like stubbornness; they come and go (or don’t go) as they please, attach themselves to other elements in awkward “barges” of palettes that require constantly clicking tiny (tiny!) triangles or symbols to exert some measure of control. Some palettes are inseparable (Browser/Folders/Metadata); others can’t be visible at the same time (Metadata, Browser).
Just a few examples: Why can’t I see files, folders and shooting info at the same time, or under the image itself, etc? Why does the folder list collapse when viewing shooting info? Why do Nikon View and Capture NX behave differently when double-clicking a file? The whole interface feels unstable and quirky. Advice to Nikon engineers: take a break from features and study Apple’s Aperture.
Here are just a few of the problems in the interface, mainly with the pallets
- Resizable elements forget their size. On my system, they also position themselves so that they look like they’re off the right side of the screen. They can span two screens, make it very tedious to resize and position them.
- Dragging any of the palettes around can be very difficult; the drag bar is on the left side with some palettes and the right side on others! It’s also hard to distinguish visually. Resizing element are tiny and hard to see, also swapping position from lower left to lower right. This is what I mean be “unstable”; one can never figure out where something might be in NX.
- Zooming a palette grows it to the right while ( in some cases) simultaneously disappearing attached palettes (eg Browser and Folders). This is very unsettling.
- It seems to be impossible to detach the folders or metadata list from the browser; they seem to be one giant Pangea, a huge useless blob. The metadata palette keeps resizing itself as part of Pangea.
- It takes work to figure out how to get rid of a palette entirely, especially those tied to others. For example, I want the Metadata palette to go away and never be shown. Apparently not possible.
- Palettes disappear when clicking to another program, so any displayed data can no longer be seen. That’s fairly normal for most programs, but when shooting info and images are included in palettes, its self-defeating.
- No way to see the file browser and metadata at the same time; open one and the other closes. Close the one you opened and the other remains closed—infuriating.
- View NX and Capture NX 2 act differently, but look very similar; this is very confusing switching from one to another, which is needed because both do a bad (or no) job at some things.
There are dozens more issues, but there are better things to do than keep going. It’s pointless; the design is fundamentally flawed. Even the original Nikon Capture was preferable in the way it allowed laying out the palettes, which could be arranged and viewed as desired.
Color space
When processing image for the web, I want to process in sRGB. In Canon’s Digital Photo Professional, one can choose the color space as part of the batch operation, as well as resizing images. Capture NX2 can do neither; a global setting has to be changed (and then changed back).
Batch processing — barely usable
Try selecting a group of images and batch processing them—in Canon’s Digital Photo Professional a quick cmd-B keyboard shortcut brings up a dialog. Hit the Enter key and you’re done. No such convenience exists in Capture NX 2. The batch processing requires a folder, not a selection.
To solve the batch selection issue, one must manually move desired images into their own folder. Worse, Capture NX attempts to batch-processes both NEF and JPEG files of the same name. Removing the JPEG files should not be required to batch-process a group of NEF files! Again, there might be some kind of workaround, but this author expects things to just work intelligently.
And here’s the kicker: once a batch job is started, no more batch jobs can be added; you must wait. Given the folder orientation for batch processing, how does one process 10 folders... dump all the files into one huge folder? No, one waits and waits for the batch to finish. That is not batch mode, it’s waste-time mode, a colossally infuriating design.
Copy/paste for adjustments
Select an image and copy its settings using a popup menu found in a tiny triangle in the Edit List palette, which might not be expanded, effectively hiding it. Inexplicably, it’s under the menu instead of the Edit menu. There is a Copy command in the edit menu...copy what? There is also no command key shortcut for .
Why can’t image adjustments be copied by right-clicking on the image itself? Here’s what you get. Why aren’t there and choices?
When you finally do paste the settings to a single image, prepare to be annoyed every single time about whether to overwrite base processing parameters.
For more “fun”, select 10 images and paste adjustments (it may take a few minutes to figure out how to do this). Then enjoy the batch processing dialog that appears. What does pasting image adjustments have to do with batch processing and input/output folders, etc? It’s baffling.
File bloat, Data risk, slow saves
Make the tiniest change to a NEF (RAW) file and you lose—your time, your disk space. For example, change the white balance and save the NEF. A 14.3MB NEF file inexplicably becomes an 18.6MB file—30% larger. Worse, it takes 5-10 seconds to save (on a quad-core 3GHz Mac Pro with a 4-drive striped RAID capable of 350MB/sec). Do the NX2 engineers really think this is the way it should work? Canon’s DPP can save settings for hundreds of files in the time it takes NX2 to save them for a single file—and you don’t lose gigabytes of disk space in the process.
Worse, your file is put at risk of data corruption due to overwriting the original file. This is not an idle concern; Nikon itself warned of data corruption with Capture NX and Mac OS X Leopard (now allegedly fixed)! Your file date is modified as well. Capture NX violates a fundamental data-integrity rule: never write over an original file. At least with Canon’s DPP, space is set aside in advance for the settings, which makes it fast and low-risk.
The storage issue is a major nuisance, the potential data corruption a serious concern, but the performance issue is a show-stopper. Working through large numbers of images, one just can’t waste 10 seconds per file for a save (which includes answering the inane dialog about saving).
Anomalies
Capture NX 2 has crashed on me a number of times, but is generally quite stable and more responsive than any previous Nikon software.
One problem: I found it extremely confusing to understand when my processing steps were to be included. Several times I processed files (“Open With”) only to find that the steps (retouching, etc) had simply not been included, even though they were enabled (checked). Put simply, even if this is “as designed”, it’s horribly confusing. Presumably this behavior is a bug.
Processing images with Picture Control
One of the basic features of NX is its setting, which is a glorified way of grouping sharpness/contrast/brightness/etc. These controls can be used for in-camera JPEGs as well as in Capture NX 2.
Picture Control in Capture NX 2
The various choices result in quite different results. When you plan on post-processing the image further, your best bet is Standard or Neutral : it contains maximal tonal range and minimal sharpening, ideal for further work. Other settings, like and will “pop” more, but also pin dark tones to black, and blow highlights with some images—not good for post-processing.
Below are examples processed with the different settings. The image looks “flat” — exactly what you want for post-processing, with no “blown” highlights and no dark tones “pinned” to black.
NX2 Neutral — best for post-processing
For quickie processing, produces believable results, with a balanced mix of contrast, color saturation and sharpening. Try with some minor tweaks to exposure compensation, contrast and saturation for quick and easy results that look natural.
NX2 Standard — balanced results
The and modes are “over the top”, but former Fujichrome Velvia shooters might find the results believable. These modes are useful for the same reason TVs displayed for sale look so garish—they grab one’s attention with mind-blowing color and contrast. Each to his/her own taste. Of course, an image that is really “flat” to begin with might benefit from either mode.
NX2 Standard (left), NX2 Landscape (right)
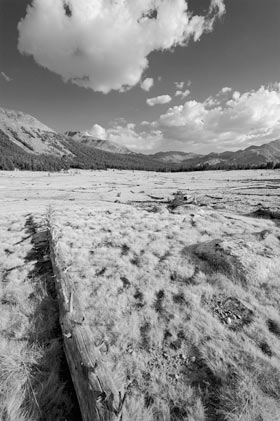
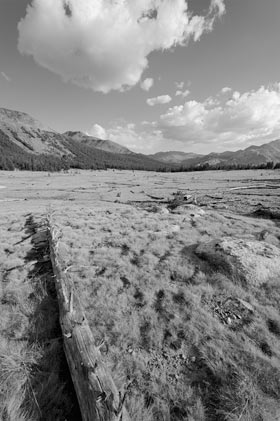
The picture control offers little control in NX, which is a shame. However, results are quite nice for generic black and white conversion.
NX2 Monochrome
For flexibility and many different looks, you are much better off post-processing in Photoshop. Process the image in color. The resulting color image offers three color channels, which can be used individually, or mixed in any proportion. In Photoshop, display the desired color channel, then choose .
Red/Green/Blue color channels from the Standard color images
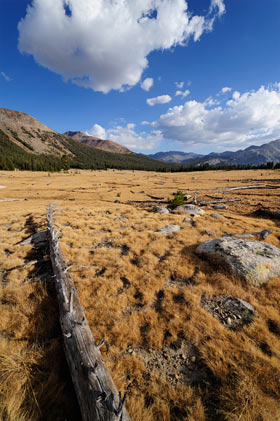
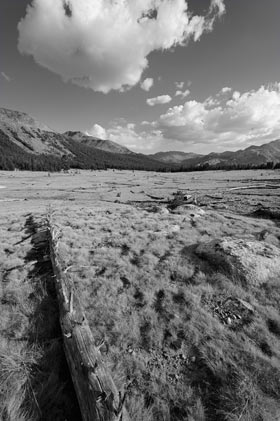
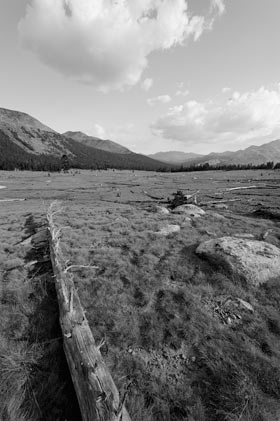
Your best bet in Photoshop is to use a conversion layer (). Shown below is the simulated infrared result; there are many other possibilities, and you can customize the mix.
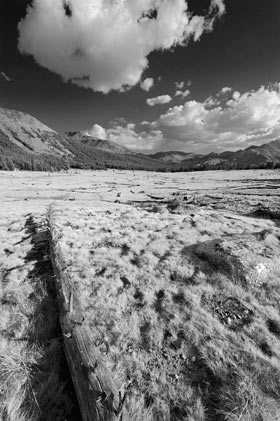
Simulated infrared
Preferred settings
Shown below are my preferred Camera Settings for Capture NX2, read on for details.
: use or most of the time
: use or most of the time [why]
: turn it off
: use it selectively only, see note below
The ungainly palettes in Capture NX2
Active D-Lighting
Of particular concern is the settings. This won’t appear unless it was enabled in the camera (it can be added as a step if not originally enabled). What is really confusing is that unchecking the box does not turn it off! You must keep it checked and choose Off (just one of the dozens of infuriating user interface annoyances in NX2).
Worse, using ADL in the camera causes misleading results with the histogram when shooting. This has caused me to underexpose by 1-2 stops with some images (using manual exposure).
If you’re shooting RAW, turn off off in the camera!
If you’re shooting JPEG (only), it’s a highly useful feature in producing more balanced images. I recommend setting the camera to Low or Normal for JPEGs.
Noise reduction
I rarely use noise reduction with Nikon D3 images, because the noise itself is such high quality—not at all displeasing. Only starting at ISO 3200 do I consider using it (for Nikon D3 images). Other lesser cameras might find it useful at ISO 800 or 1600.
Quick fix
I use this palette a fair amount to add exposure compensation. The feature is also quite useful, generally at settings in the 10-30 range, though I’ve used it for campfires scenes up to its maximum. It works well most of the time, other times it can look unnatural—try it and see—it can rescue otherwise problematic images.
Camera & Lens corrections
Unless you’re trying to compare lenses, always leave enabled, it works great with no downside.
The feature can be highly useful to reduce or increase vignetting; I use it regularly.
The other settings are of little value for most images; I’ve never bothered with them.
Conclusions
While Nikon’s hyperbole about “revolutionizing” image processing is de-rigueur for press releases, Capture NX 2 really does offer some truly advanced and time-saving features that make it well worth considering.
Those photographers working with Nikon digital bodies have in Capture NX 2 a RAW-file converter capable of outstanding image quality, along with the convenience of “eliminating the middleman” eg Photoshop. It is quite possible that some photographers could work almost entirely in Capture NX to produce a finished image ready for print (even from Capture NX), avoiding the complexity of layers, etc in Photoshop.
Photographers looking for fast and efficient workflow for dozens or hundreds of images in batches or groups won’t find Capture NX 2 any more appealing that version 1.x; it’s just way too tedious to perform operations on more than a few images.